N104
Administrator

Joined: 24 May 2012
Posts: 1382
Location: Pennsylvania
|
 Posted: Fri Sep 27, 2013 11:50 am Post subject: Alien Relics Guide by N104 Posted: Fri Sep 27, 2013 11:50 am Post subject: Alien Relics Guide by N104 |
 |
|
Alien Relics Guide by N104
I follow this guide when I play Alien Relics and I win about 70% of the time.
Map Image
Image 1 is an image of the map when the game starts.
Defog Paths
Blue: Defogging is important in this map because you need to build differently depending on how red opponent builds. Use the two Security Guards you start with to defog the map. Follow the blue line in Image 2 from your base to red's base. When the blue line splits into two lines, have one Security Guard follow one line and the other Security Guard follow the other line (the two lines rejoin).
Red: Defogging is important in this map because you need to build differently depending on how red opponent builds. Use the two Security Guards you start with to defog the map. Follow the red line in Image 2 from your base to blue's base. If blue deploys his/her Dominion at it's initial position, you can quit the defog path half way through and put your Security Guards at a place that will block blue from building over the rocks/cliffs (more info on that later).
Build for Blue
If red builds over the rocks/cliffs (like in Image 3 and Image 4) follow the build pattern for blue in Image 4. The numbers above each building tell you the build order. So build the building with a 1 above it first, build the building with a 2 above it second, and so on and so on. If red does not build over the rocks/cliffs, follow the build pattern for blue in Image 3. Also, remember to sell the R&D Center as soon as it has finished upgrading your VTS, because it will gain you money and conserve on power. Build any additional buildings you may want but don't build too much since there isn't a lot of Galaxite in this map. I normally build an army of Hydras, Cyclops, and Liberators and attack when I have an army of about 20-30 units.
Build for Red
If blue builds over the rocks/cliffs (like in Image 3 and Image 4) follow the build pattern for red in Image 4. The numbers above each building tell you the build order. So build the building with a 1 above it first, build the building with a 2 above it second, and so on and so on. If blue does not build over the rocks/cliffs, follow the build pattern for red in Image 3. Also, remember to sell the R&D Center as soon as it has finished upgrading your VTS, because it will gain you money and conserve on power. Build any additional buildings you may want but don't build too much since there isn't a lot of Galaxite in this map. I normally build an army of Hydras, Cyclops, and Liberators and attack when I have an army of about 20-30 units.
Blocking Blue
Red: If blue deploys his/her Dominion at it's initial position, you can use your Security Guards to block him/her from building over the rocks/cliffs (see Image 5 for how to position your Security Guards). If blue cannot build over the rocks/cliffs, you can take control of the center which will give you control over the majority of the map's Galaxite supply. Stopping blue from building over the rocks/cliffs is a great offensive move on red's part.
Blue: Sorry, there's no way you can stop red from building over the rocks/cliffs near his/her base with just your two Security Guards (you'd need at least 3 units). But there is a way to make it so red can't hinder you from building over the rocks/cliffs near your base with just his/er two Security Guards. To prevent red from blocking you from building over the rocks/cliffs, move your Dominion one 'block' down from it's initial position, transform it into a Headquarters, and then proceed building your base.
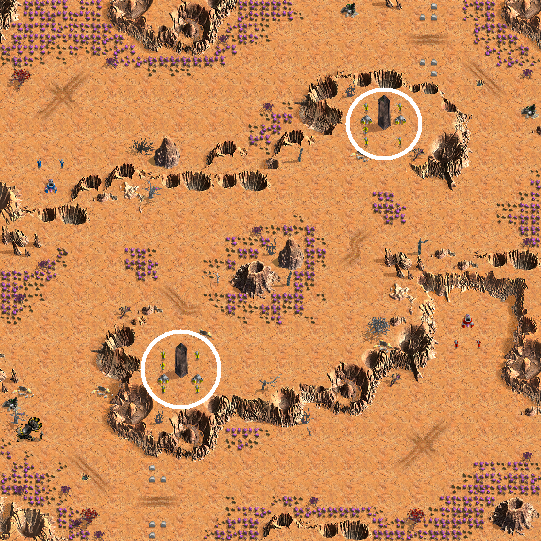
Oblisks
There are two oblisks in this map (they are circled in white in Image 6). If you put a unit under one, it will give you 4,000 Galaxite credits and then deactivate it so your opponent cannot get credits by putting a unit there. The oblisks are guarded by yellow units, so you will need to destroy the yellow units to get the Galaxite credits. I found I can destroy the force guarding one oblisk with 3-4 Liberators.
Image 1 (map image)

Image 2 (defog paths)
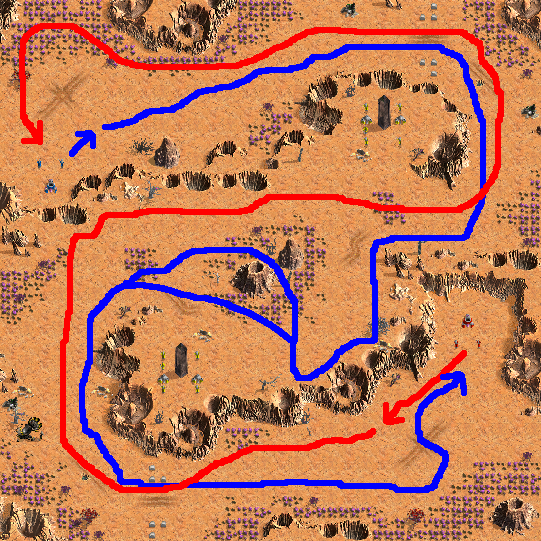
Image 3
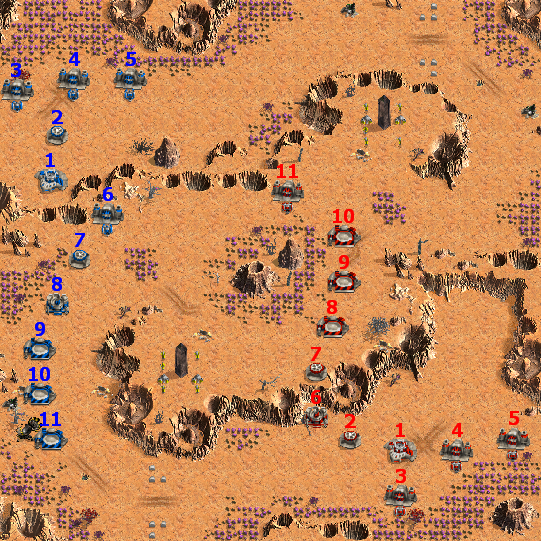
Image 4
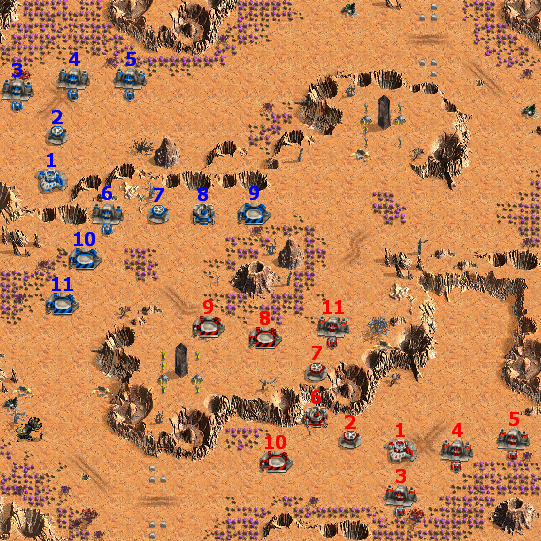
Image 5 (blocking blue)
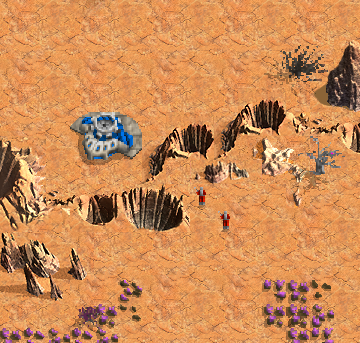
Image 6 (oblisks)
_________________
Warfare Incorporated Development |
|


